# Connect Wallet
**To trade on the PNIX DEX, you need to connect a supported wallet.**
**Currently supported wallets include una Wallet, WEMIX Wallet, PLAY Wallet, OKX Wallet, and MetaMask.**
To connect a wallet, it must be installed on the user's PC or mobile device beforehand.
Wallet connection can be done using the following methods.
{% tabs %}
{% tab title="WEMIX PLAY Wallet" %}
**Connecting WEMIX PLAY Wallet**
WEMIX PLAY Wallet
To connect your WEMIX PLAY Wallet, you'll need to start by installing and signing up on your smartphone. \
\
(For detailed instructions on installing and registering the WEMIX PLAY Wallet, please refer to the guidelines provided for that specific wallet.)
* Once you've completed the installation and registration process, head over to the top right corner of the screen and click on "Connet to Wallet". This action will estalish the connection between your wallet and the PNIX DEX seamlessly.
* To proceed with WEMIX PLAY Wallet connection, follow the steps for WEMIX PLAY Wallet authentication based on your PC or mobile environment.
* **For PC EnvironmentPC:**
* Simply follow the instruction displayed on the screen, which will prompt you to prerform a QR code scan authentication using the WEMIX PLAY Wallet app on your smartphone. This will securely authenticate your wallet and establish the connection.
* Once the wallet signing process is successfully completed, you'll immediately see the corresponding wallet address displayed.
* **In case of Mobile Environment:**
* Click on the WEMIX PLAY Wallet Connection shown on the screen, and then processd by following the authentication procedure within the WEMIX PLAY Wallet app.
* Once the wallet signing process is complete, the associated wallet address will be displayed.
{% endtab %}
{% tab title="una Wallet" %}
**Connecting una Wallet**
To connect your una Wallet, you'll need to start by installing and signing up on your smartphone.
(For detailed instructions on installing and registering the PLAY Wallet, please refer to the guidelines provided for that specific wallet.)
* Once you've completed the installation and registration process, head over to the top right corner of the screen and click on "Connet to Wallet". This action will establish the connection between your wallet and the PNIX DEX seamlessly.
* To proceed with una Wallet connection, follow the steps for una Wallet authentication based on your PC or mobile environment.
* **For PC EnvironmentPC:**
* Simply follow the instruction displayed on the screen, which will prompt you to prerform a QR code scan authentication using the una Wallet app on your smartphone. This will securely authenticate your wallet and establish the connection.
* Once the wallet signing process is successfully completed, you'll immediately see the corresponding wallet address displayed.
* **In case of Mobile Environment:**
* Click on the una Wallet Connection shown on the screen, and then processd by following the authentication procedure within the una Wallet app.
* Once the wallet signing process is complete, the associated wallet address will be displayed.
{% endtab %}
{% tab title="PLAY Wallet" %}
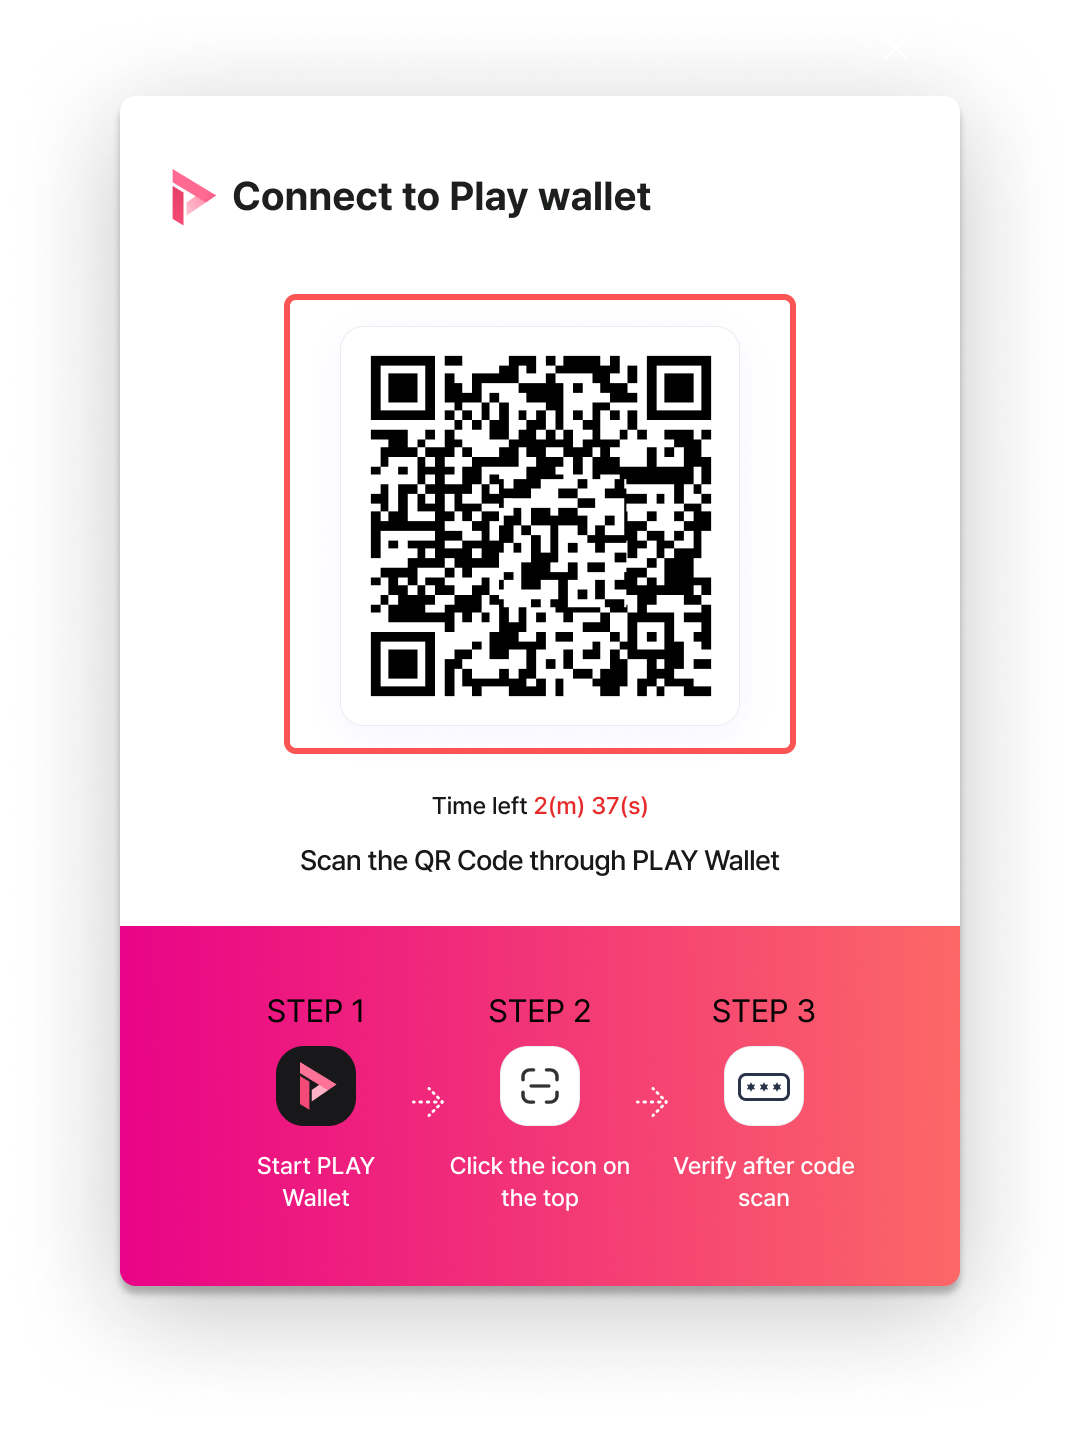
**Connecting PLAY Wallet**
To connect your PLAY Wallet, you'll need to start by installing and signing up on your smartphone. \
\
(For detailed instructions on installing and registering the PLAY Wallet, please refer to the guidelines provided for that specific wallet.)
* Once you've completed the installation and registration process, head over to the top right corner of the screen and click on "Connet to Wallet". This action will estalish the connection between your wallet and the PNIX DEX seamlessly.
* To proceed with PLAY Wallet connection, follow the steps for PLAY Wallet authentication based on your PC or mobile environment.
* **For PC EnvironmentPC:**
* Simply follow the instruction displayed on the screen, which will prompt you to prerform a QR code scan authentication using the PLAY Wallet app on your smartphone. This will securely authenticate your wallet and establish the connection.
* Once the wallet signing process is successfully completed, you'll immediately see the corresponding wallet address displayed.
* **In case of Mobile Environment:**
* Click on the PLAY Wallet Connection shown on the screen, and then processd by following the authentication procedure within the PLAY Wallet app.
* Once the wallet signing process is complete, the associated wallet address will be displayed.
{% endtab %}
{% tab title="WEMIX Wallet" %}
**Connecting WEMIX Wallet**
To connect your WEMIX Wallet, you'll need to start by installing and signing up on your smartphone. \
\
(For detailed instructions on installing and registering the WEMIX Wallet, please refer to the guidelines provided for that WEMIX Wallet.)
* Once you've completed the installation and registration process, head over to the top right corner of the screen and click on "Connet to Wallet". This action will estalish the connection between your wallet and the PNIX DEX seamlessly.
* To proceed with WEMIX Wallet connection, follow the steps for WEMIX Wallet authentication based on your PC or mobile environment.
* **For PC EnvironmentPC:**
* Simply follow the instruction displayed on the screen, which will prompt you to prerform a QR code scan authentication using the WEMIX Wallet app on your smartphone. This will securely authenticate your wallet and establish the connection.
* Once the wallet signing process is successfully completed, you'll immediately see the corresponding wallet address displayed.
* **In case of Mobile Environment:**
* Click on the WEMIX Wallet Connection shown on the screen, and then processd by following the authentication procedure within the WEMIX Wallet app.
* Once the wallet signing process is complete, the associated wallet address will be displayed.
{% endtab %}
{% tab title="OKX Wallet" %}
**Connecting OKX Wallet**
To connect your OKX Wallet, you'll need to start by installing and signing up on your smartphone. (For detailed instructions on installing and registering the OKX Wallet, please refer to the guidelines provided for that specific wallet.)
* Once you've completed the installation and registration process, head over to the top right corner of the screen and click on "Connet to Wallet". This action will estalish the connection between your wallet and the PNIX DEX seamlessly.
* To proceed with OKX Wallet connection, follow the steps for OKX Wallet authentication based on your PC or mobile environment.
* **For PC EnvironmentPC:**
* Install OKX Wallet from the Google Chrome Extension store.
* Once the wallet signing process is successfully completed, you'll immediately see the corresponding wallet address displayed.
* **In case of Mobile Environment:**
* Click on the OKX Wallet Connection shown on the screen, and then processd by following the authentication procedure within the OKX Wallet app.
* Once the wallet signing process is complete, the associated wallet address will be displayed.
{% endtab %}
{% tab title="MetaMask" %}
**Connecting MetaMask**
To connect with Metamask, users must first install the extension and create a wallet on their Chrome browser.\
\
(Installation and wallet creation for Metamask are subject to the guidelines provided by MetaMask.)
* Once you've completed the installation and registration process, head over to the top right corner of the screen and click on "Connect Wallet". This action will estalish the connection between your wallet and the PNIX DEX seamlessly.
* Select "Connect Wallet" and proceed with connecting MetaMask, depending on whether you're using a PC or mobile environment.
* **For PC EnvironmentPC:**
* Simply follow the instruction displayed on the screen, which will prompt you to prerform a QR code scan authentication using the MetaMask app on your smartphone or MetaMask signing process using the MetaMask google extention program on your google chrome browser. This will securely authenticate your wallet and establish the connection.
MetaMask Google Extension Program
* Once the wallet signing process is successfully completed, you'll immediately see the corresponding wallet address displayed.
* **In case of Mobile Environment:**
* Click on MetaMask Connection shown on the screen, and then processd by following the authentication procedure within the MetaMask app.
* Once the wallet signing process is complete, the associated wallet address will be displayed.
{% endtab %}
{% endtabs %}
---
# Agent Instructions: Querying This Documentation
If you need additional information that is not directly available in this page, you can query the documentation dynamically by asking a question.
Perform an HTTP GET request on the current page URL with the `ask` query parameter:
```
GET https://docs-en.pnix.exchange/decentralized-exchange/step-by-step-user-guide/connect-wallet.md?ask=
```
The question should be specific, self-contained, and written in natural language.
The response will contain a direct answer to the question and relevant excerpts and sources from the documentation.
Use this mechanism when the answer is not explicitly present in the current page, you need clarification or additional context, or you want to retrieve related documentation sections.